Authentication with other Bizagi project using Oauth 2.0
Overview
This section describes how to configure OAuth in your Bizagi project, so that this one delegates authentication to another Bizagi project. The Bizagi project set to use OAuth for authentication purposes will be referred to as the Client project, while the target one granting access will be referred to as the Server project.
Note:
This implementation does not work for Trial versions since they are multitenant environments. For this, an enterprise and on-premise environment must be used.
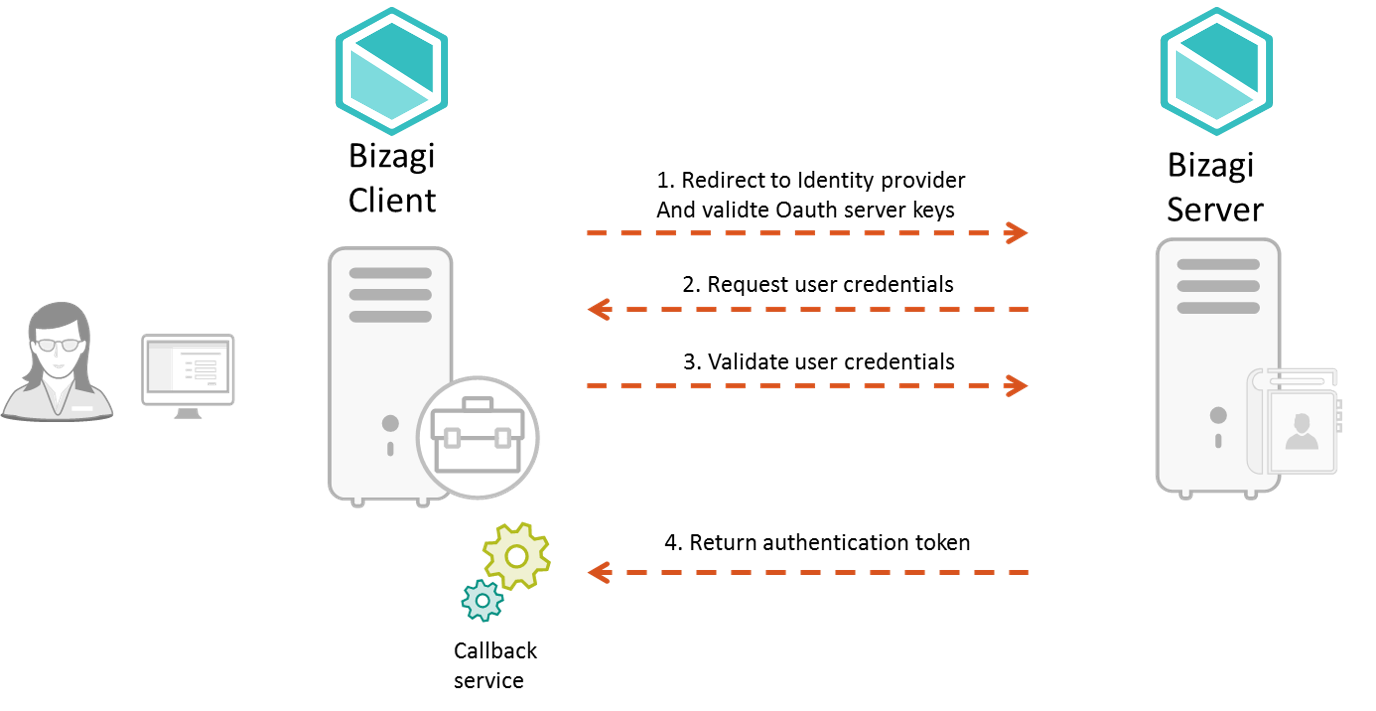
The following diagram shows the steps to authenticate a user when you use another Bizagi project.
-
Redirect to the identity provider and validate OAuth server keys. When a user tries to access the Bizagi client project, this redirects the request to the Bizagi server. First, the Bizagi server validates the OAuth keys (Client ID and Client Secret), and the Redirect URI. If any of these does not match, the Bizagi client displays an error message.
-
The Bizagi server requests the user credential using the login page for the Bizagi server project.
-
After the user inputs the credentials, the Bizagi server validates the user's credentials.
-
If the credentials given by the user are correct, the Bizagi server returns the authentication token, so it gives access to the Work Portal of the Bizagi client. For this purpose, Bizagi has a callback service, that is configured as the redirect URI, that waits for the answer of the Bizagi server in the authentication procedure using the OAuth protocol.
Note:
If you plan on using an authentication method different than Bizagi and you are performing a deployment to an environment with no users on it (normally this would only be the case for a project's first deployment), follow these steps so that you can correctly configure your users and authentication without getting locked out of the Work Portal:
- Perform the deployment with the authentication method set to Bizagi. This lets you access the Work Portal as the Admin user without providing any credentials.
- Once in the Work Portal, you can manually enter your users, or alternatively rely on the method of your choice to synchronize your users' information into the WFUser table (SOAP, Excel file, LDAP Synchronization, or performing a Data Synchronization procedure).
- Perform an IISRESET so that the Admin user can no longer access the Work Portal.
- After having your users registered in the Work Portal, use the Management Console to set the authentication method to your preferred one.
If you plan on using LDAP authentication with periodic user synchronization, you may ignore the previous steps since you will only need to wait until the next synchronization happens for your users to be able to log into the Work Portal.
What You Need to Do
To configure your Client project to sign in by relying on a Server project, please follow these steps:
- Make sure that the Server project supports OAuth.
- Generate access keys for OAuth access.
- Set the authentication type in the Client project, through Bizagi Studio.
- Synchronize the users from your Server project into your Client project.
Note:
The steps oriented toward configuring such integration will require specific technical details (e.g., endpoints, authorized credentials), which are usually managed by an IT admin.
Therefore, these steps will require a profile having expertise on this matter and having access to the information mentioned above.
1. Make Sure That the Server Project Supports OAuth
At the Bizagi Server project, you may use any type of authentication.
You will first need to make sure that such a project was created in version 11.1 or higher, and that such project was NOT migrated from a previous Bizagi 10.x version.
2. Generate Access Keys for OAuth Access
Once you have ensured that your Server project supports OAuth according to its version, go to the Work Portal and proceed to obtain OAuth credentials (Client ID and Client Secret) as described below:
2.1 Register the OAuth Application
Click on the OAuth2 Applications option available under the Admin menu to grant access to an external application.
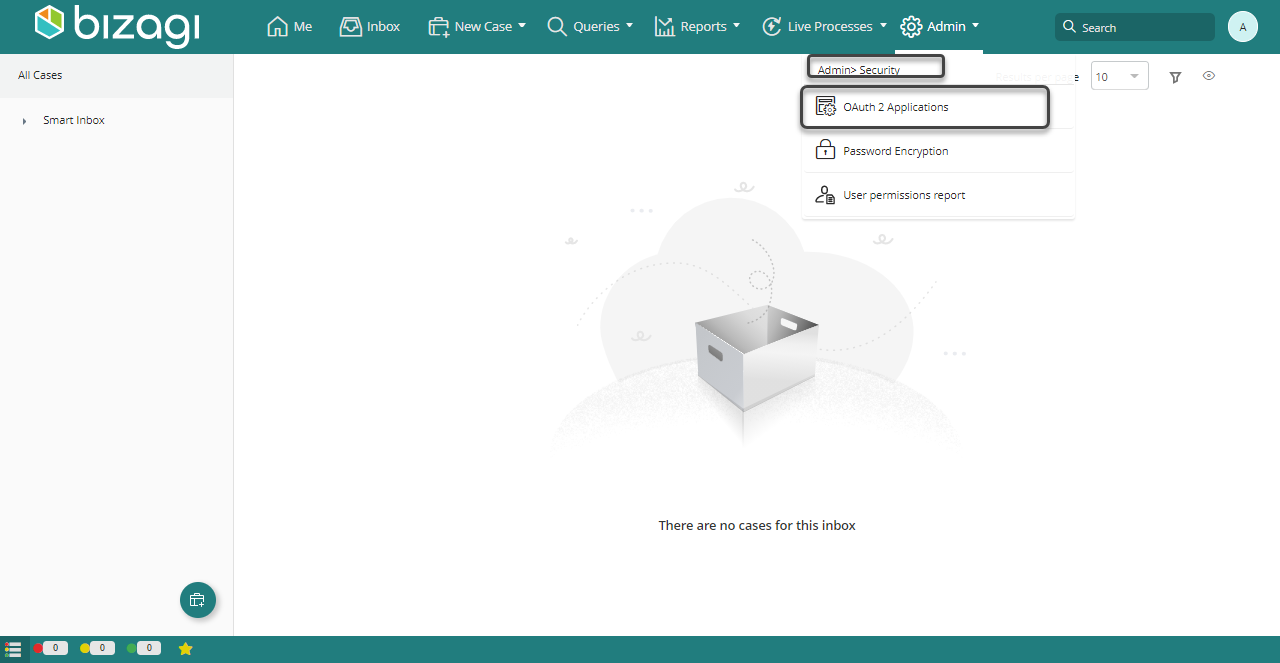
Notice this option lists services being accessed by Bizagi devices, but it allows you to include additional applications that represent granted access to the services by getting appropriate access keys.
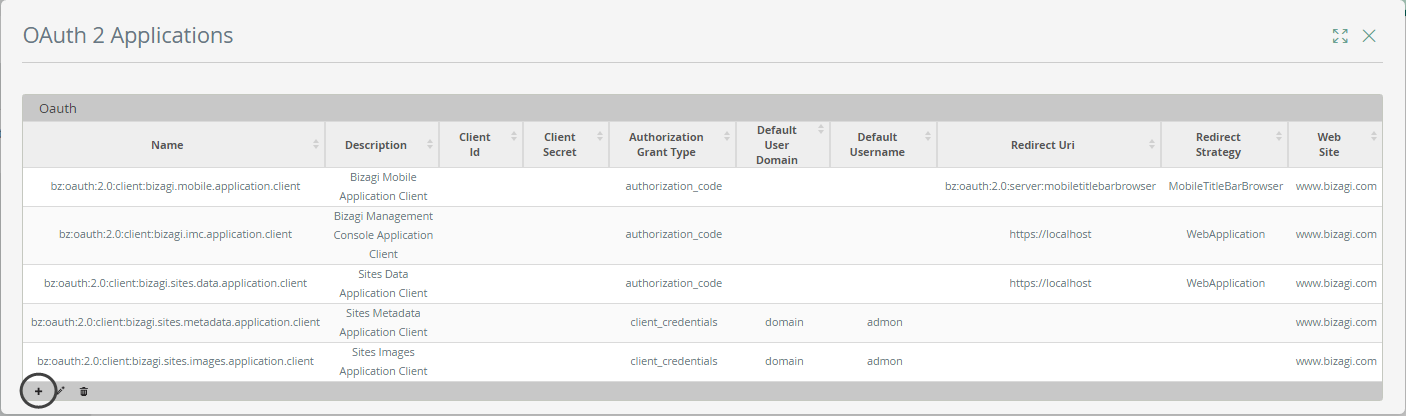
2.2 Add a New Application
Click on the option to add a new record in this table:
Note:
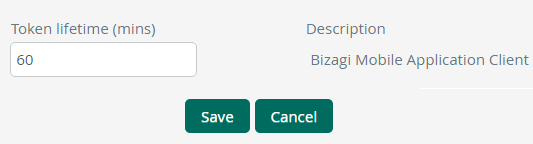
For the default and system settings, you may only choose to edit the token's lifetime, which determines the number of minutes after which a token expires (to enhance the security employed by these tokens, especially regarding replay attacks).
When defining the new application, make sure you consider the following details:
- Name: Give a unique and representative name.
- Grant type: For this particular scenario (connecting a Client project to a Server project), use Authorization Code.
- Web Site: Specify the URL of your Client project for descriptive purposes.
- Allowed Scope: For this particular scenario (connecting a Client project to a Server project), use Login.
- Redirect strategy: For this initial test and general use, consider setting Web Application.
- Redirect URI: Define the URL to which there will be directed in the callback once a user inputs their credentials.
- Token lifetime: Define the number of minutes for which a token is valid and can be reused for another invocation (usually to enhance security while avoiding replay attacks).
An usual or recommended setting should consider not exceeding 15 minutes.
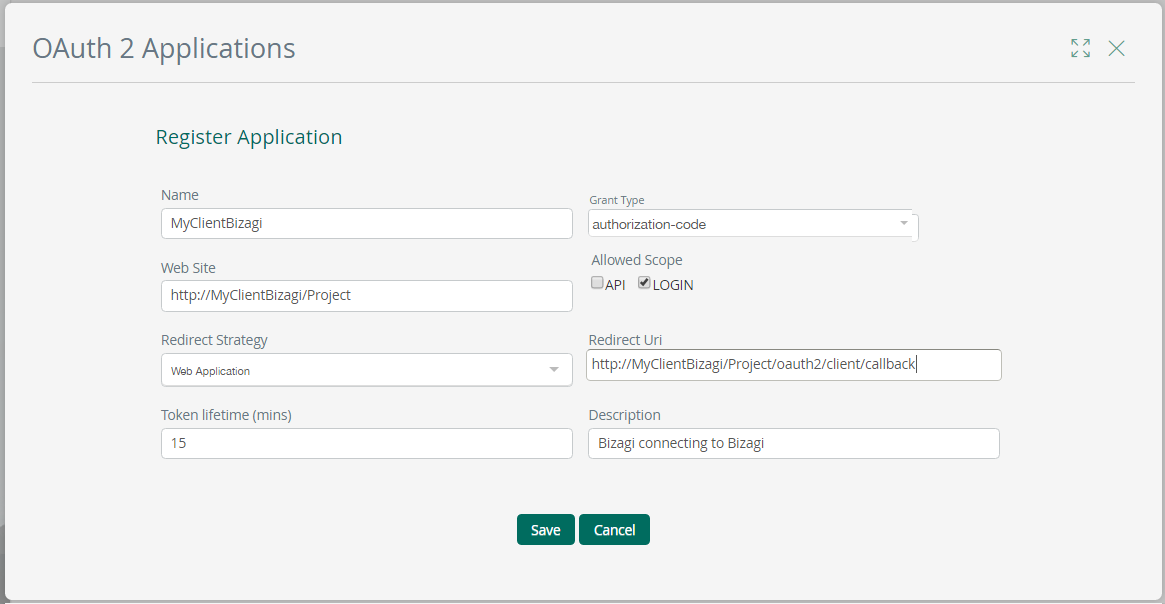
Once you are done, click Save.
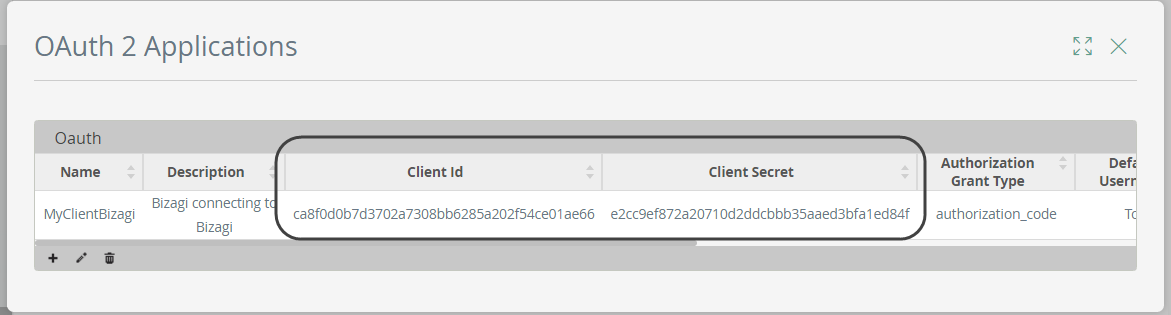
You will notice that your new registered application is listed along with its access keys.
2.3 Copy the Access Keys
Access keys, which will be needed in the next step, are:
- Client ID
- Client Secret
3. Set the Authentication Type in the Client Project
To explicitly choose Bizagi authentication, follow these steps:
3.1 Open Your Bizagi Studio Project
Open Bizagi Studio and load your project (Development environment).

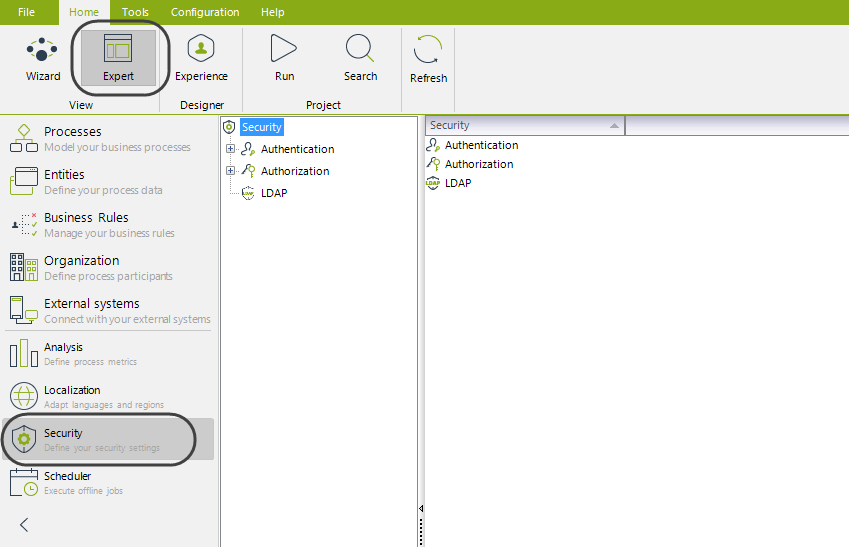
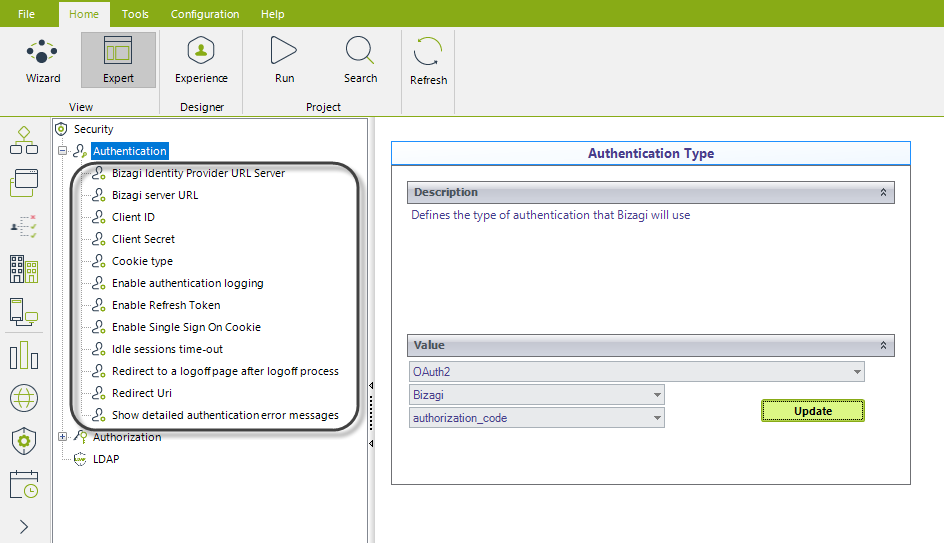
3.2 Go to the Security Settings
Click on the Expert view, and select the Security module.
Click on Authentication in the middle panel, and make sure that the drop-down list at the rightmost panel shows OAuth.
Next, for the drop-down appearing right below, make sure you select Bizagi.
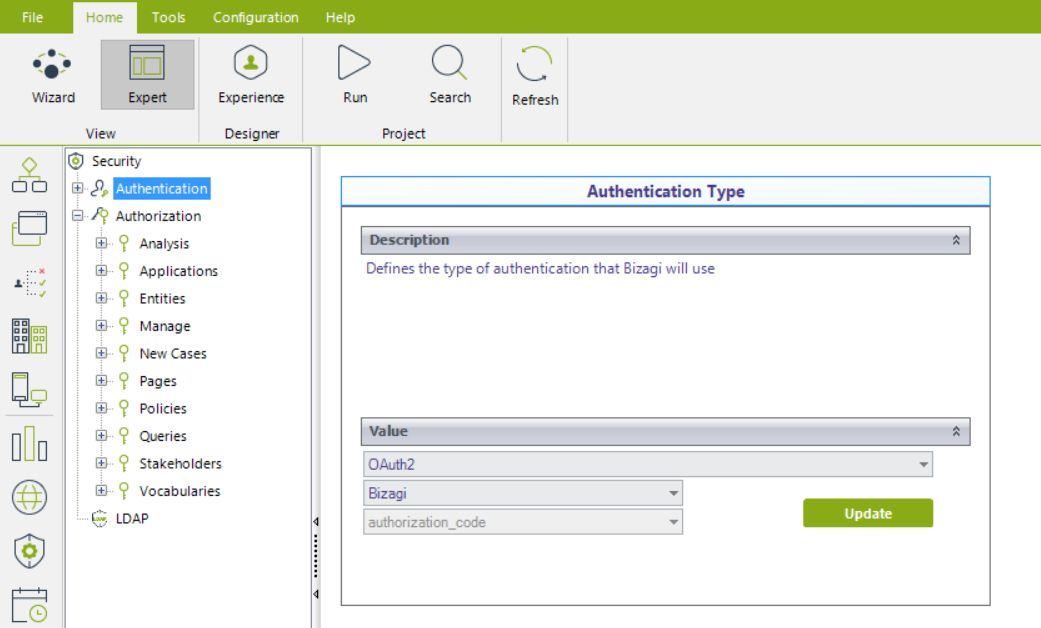
Click Update if you had a different choice before.
Upon setting this authentication type, notice that further parameters will be listed as sub-items:
3.3 Configure OAuth Parameters
Refer to the details provided in the table below:
| PARAMETER | DESCRIPTION |
|---|---|
| Bizagi Identity Provider URL Server | Defines the Bizagi server URL for the Server project in charge of authenticating users. For Automation Service: https://[project_environment]-[your_project]-[your_company].bizagi.com |
| Client ID | Holds the client ID as generated in your Server project's OAuth application. |
| Client Secret | Holds the client secret as generated in your Server project's OAuth application. |
| Cookie type | Defines whether Bizagi uses Persistent or Session cookies. The idle session time-out defines the expiration time for cookies. |
| Enable authentication logging | Establishes if an audit log is recorded with all authentication events. If enabled, look for the table AUTHOLOG in the database. |
| Enable Refresh Token | Enables an automatic token refresh treatment (if set as On), so that users are not prompted to re-enter credentials if the token has expired. |
| Enable Single Sign-On Cookie | Enables a Single Sign-On experience by relying on cookies (if set as On). |
| Idle session time-out | Defines the time in minutes in which an idle session expires, requiring re-authentication. |
| Redirect to a logoff page after logoff process | Defines if users are redirected to a static logout page when they logout. |
| Redirect URI | Defines the callback URI after a successful authentication. For Automation Service: https://[project_environment]-[your_project]-[your_company].bizagi.com/oauth2/client/callback |
| Show detailed authentication error messages | Defines if authentication errors are shown in a detailed way when they occur. |
Important Notes
Consider the following restrictions regarding error handling when connecting a Client project to a Server project:
- Error messages are not currently localized to different languages (shown only in English).
- Error messages are not different across environments (Development, Testing, or Production).
- No error page is shown whenever connectivity fails between the Client project and Server project, especially if nesting more than one project under this treatment.
- Logs are not recorded with further detail (e.g., Event Viewer).
- The following settings in the Server project (applies when using Bizagi authentication) are not configurable for the Client project:
- Enable password change after the first login.
- Idle account duration before lockout.
- Password restoring options.